
1. Workflow Configuration
Step 1: Create a Workflow by going to the Workflows section and clicking "Create workflow" on the top right. Create button in Workflow List provides the view.
Step 2: The pop-up window for creating a workflow will open where the workflow name can be entered, and click the "Create" button to open a blank workflow canvas that can configure the workflow nodes and routes. The pop-up window for creating a workflow provides the view.
Step 3: Click the "+" sign between two nodes to add a new node. On the right panel, the node menu will appear (if any node cannot be added to the current position, the node will be grayed out and unavailable). A Workflow is built with a series of nodes. Think this as a Lego house. You have three kinds of building blocks. Interface, action and conditions.
-
Interface: Nodes that interact with the user interface
-
Actions: Take action on an object.
-
Condition: Use "If-this-then-that" criteria related to the custom logic, etc. For more information, please view the 2.2 workflow nodes part.
Step 4: View the prompt message. If there is a "!" sign displayed below the node means that some necessary parameters or nodes are missing in the current workflow. You can click the node with the sign to view the specific prompt information and modify the workflow configuration.
2. Workflow nodes
2.1. Interface
An "Interface" means that you can configure user interaction page operations to use in the verification process. There is a list of categories, and each category includes a set of service nodes. Once selected, configuration options will appear on the right-side menu, and the interface nodes you add will display thumbnails on the canvas. Figure 15- The interface node menu provides the view of the interface menu.
-
Components
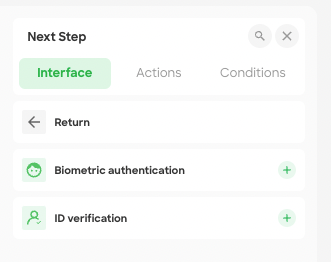
The "Component" includes Biometric authentication and ID verification services, which can be considered an aggregation built with interface nodes and data nodes. There is no position limit for these nodes, but they can only be configured once in the workflow (Figure 16 - Components menu).
-
Biometric authentication contains three nodes Face Photo, Global Face Comparison, Global Anti-Spoofing to verify they are who they say they are. After selecting "biometric authentication," three service nodes will be added to the canvas together, and any service node can be deleted after adding (shown in Figure 17 - Biometric authentication).
-
ID Verification contains three service nodes ID Photo, Unified ID Card OCR, Global ID Forgery and allows you to verify customer IDs in real-time. After selecting "ID Verification," three service nodes will be added to the canvas together, and any service node can be deleted after adding (Figure 18 - ID Verification).
-
Start Onboarding
-
-
The "Start Onboarding" node allows users to configure several components (Title, Subtitle,Image, and the Button). Figure 19 - Start Onboarding provides the view.
-
-
ID Photo
-
-
You will see three pages that this represent the sequence on your left hand. And the middle panel represents the exact same experience your end user will see . On the right side you will see two kinds of configurations. First configuration is business related and is slightly different based on the different interface, and the next configuration is about labels,same in other interface nodes. Oh, in the futures.More configurations allow you to configure the style depending on your business. ID Photo contains several pages (Select the country page, select the document type page, and upload the National ID card page) that your customer can interact with. You can define the elements on each page (shown in Figure 20 - ID Photo).
-
-
Face Photo
-
-
Face Photo allows you to configure several components (Action setting, Title, Subtitle, Content and the Button) and delete this node (Figure 21 - face photo).
-
-
End onboarding
-
-
The End Onboarding node includes the "Decline page," "Success Page," and "Pending page," which need to be used together with the "Decision outcomes" node ("Decline," "Approve," and "Review,") in the "Action" node when you make the workflow route decision (Figure 22 - End onboarding).
-
2.2 Actions
Figure 23 - Action menu
An "Action" node performs a specific action in workflow configuration (Figure 23 - Action menu). There is a list of categories, and each category includes a set of actions. Once selected, configuration options will appear on the right-side menu:
-
Data (comprises the services OSP provides and the private API you add.
-
-
Global Face Comparison is a system that can calculate the similarity of two face images and verify if two faces are from the same person and help enterprises to validate the identities of end-users.
-
Global Anti-Spoofing is used to distinguish digital representations of a user's face, between a live image, a 2D print, or a video clip by checking the live person's facial movements.
-
-
Decision outcome
-
-
Approve: The workflow route decision outcome is approved.
-
Declined: The workflow route decision outcome is declined.
-
Review: The workflow route decision outcome needs to be a manual review.
-
-
Create and assign case node
-
-
Users can configure the conditions for generating and assigning cases, and the case policy needs to be published in advance. More introduction about policy can be found in the cases policy part. After adding this node into the workflow, the detail shown in figure - Create and assign case node configuration window.
-
2.3. Condition
Figure 27 - Condition
-
The "Condition" node in a workflow consists of at least one Route branch and an Else branch. Once a condition node is added, users can add more routes, reorder existing routes, and delete routes.
Figure 28 - Condition Configuration
-
Under the Condition node configuration, click on the "Route View" icon next to the route number to define the logic of a route.
Figure 29 - Condition fileds
-
The configurable left value relies on the previous interface and action node and enters the desired conditional criteria into the 'Where' field. The entry auto-completes as you type, depending on what objects have been made available to the workflow. Additionally, the operator fields populate depending on what field is chosen.
Comments
0 comments